

Overview
Section titled “Overview”Music Assistant is meant to be picked up by using it: add a source, add a player, press play. These four pages are not a walkthrough of that.
They cover the ideas the interface assumes you already understand, so that when something is not self-evident, the explanation is here.
- This page — what the library actually holds, how the queue and Endless Mix behave, what playlists can and cannot do, and where artwork and other metadata come from
- UI — a tour of the interface itself, view by view
- Groups — playing the same music on more than one speaker at once
- Genres — how Music Assistant categorises your library, and how to shape that
None of it needs reading end to end. Use the contents list to jump to whatever you are looking for.
The Library
Section titled “The Library”The Music Assistant Library is a database containing details of the music you are interested in listening to on a regular basis. It holds information about Artists, Albums, Tracks, Playlists, Audiobooks, Podcasts and Radio Stations, which allows easy searching, display and cross referencing across the User Interface.
What ends up in the library depends on the type of source:
- Local sources: all artists, albums, tracks and playlists are imported* into the MA library when you add the source and at each sync.
- Streaming sources: only the items that are already in the streaming service’s own library (or favorites, or however the service terms it) are imported*. For example, if an artist is in your streaming library but none of their albums are, the MA library shows that artist with no albums or tracks. Add the albums or tracks to the MA library yourself if you want to see them in the library views. You can also toggle the library / streaming source filter option to see everything that is available in the streaming source.
* imported means metadata is added to the database. No files are moved or downloaded.
In each view there is a ⋮ menu in the top right corner. This menu has various library related functions. Two important ones are UPDATE METADATA and REFRESH ITEM. Update metadata only retrieves additional metadata for the item being viewed and does not alter any of the existing/base details, while refresh item completely re-adds the item into the database, overwriting all existing data. To update the images section or lyrics, UPDATE METADATA is all you need.
NOTE
If identical items (e.g. an album or track) have not been matched across sources or within a source then navigate to the Provider Details section of the item and use the options there to link them.
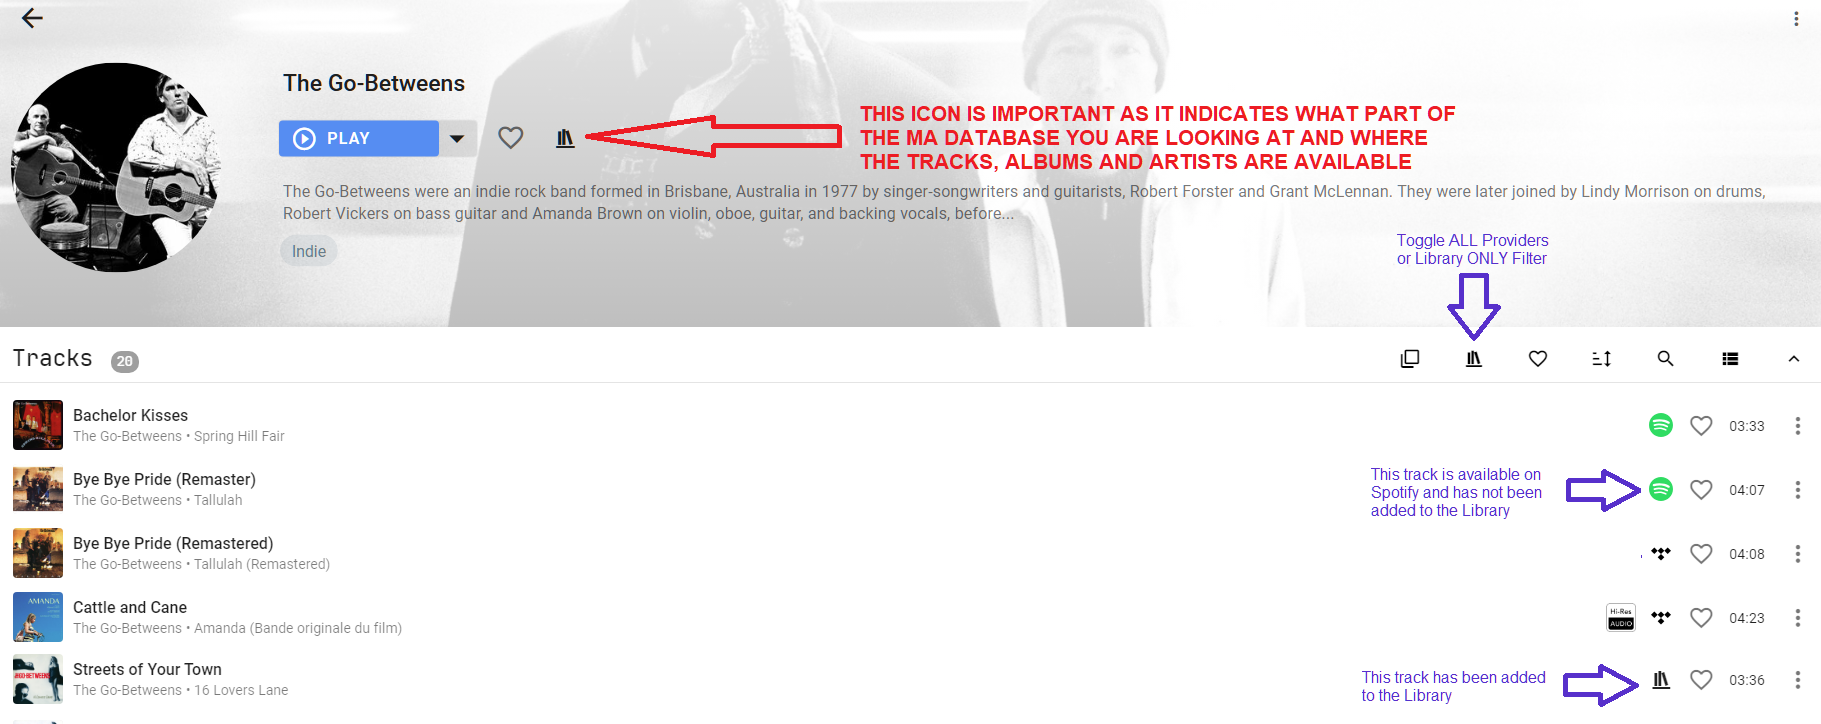
In order to make all available content accessible in a digestible manner many of the expandable views are filtered by provider. The open box icon is shown when a section is expanded and indicates that multiple providers can populate the section. Note only one can be selected at any one time. In the screenshot above “All albums” is collapsed, so the provider selection icon is not shown. Immediately below is the “Top tracks” section which is expanded and does show the icon. In both cases the currently selected provider is shown on the left side.
Favorites
As a further means of filtering the library, you can mark items as a “favourite”. This is shown in the UI as a filled heart icon. Whether items are favorited by default when imported from the music source is determined by the source settings. All items can be seen if the heart icon is deselected in the top menu.
The Queue
Section titled “The Queue”Each player has its own queue. View the queue by pressing the  button. This button can be found on the player bar at the bottom of the UI or, for narrow displays, in the NOW PLAYING view.
The queue order can be adjusted by selecting and dragging the six dot icon or via the options in the ⋮ menu.
NOTE
What happens to the queue when the different types of items (e.g. album, artist, playlist etc) are added to it is configurable in Settings → System → Player Queues
The options in the menu available in the top right is shown below.
Transferring the queue will also transfer the shuffle and repeat setting to the new player.

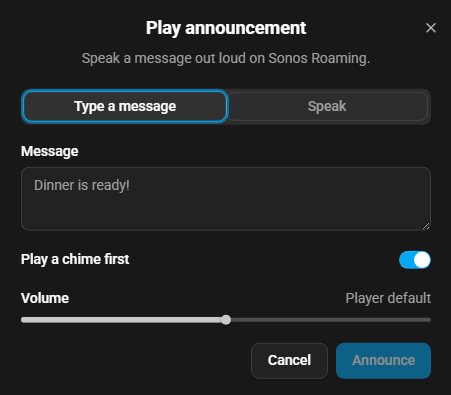
Announcements can be sent directly from the MA UI using the menu item shown above which will open the dialog shown below. The Speak option is only available when the UI is accessed via https. A TTS provider has to be selected in the System Player Settings
When Autoplay is on the mode will be automatically enabled when the last track of the queue is reached. The added tracks will be based on the settings set globally unless overridden in the queue settings.
Each queue has a number of options which affect various behaviours. The options can be set globally in the player queues settings or individually via the option in the ⋮ menu. The individual player queue settings are as follows:
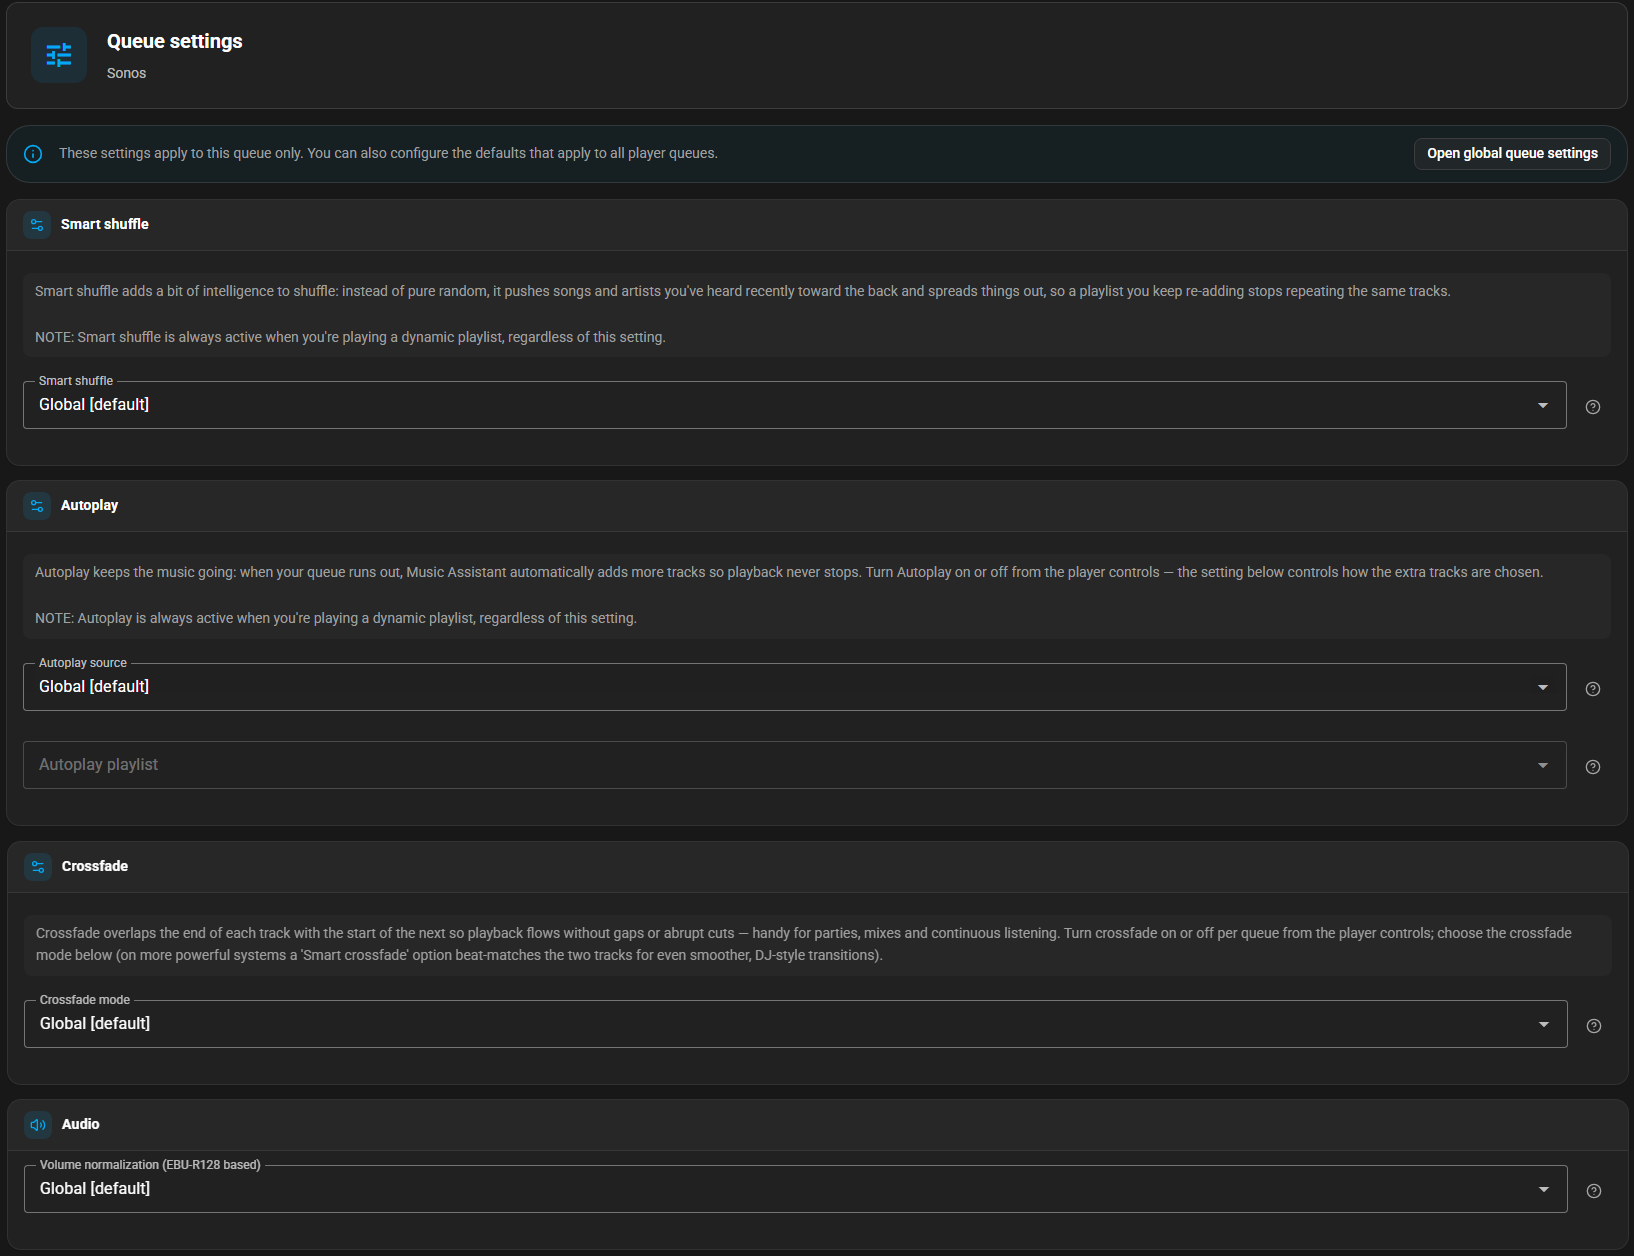
See the player queues settings section for more information about Smart Shuffle, Autoplay, and Smart Crossfade.
NOTE
If a queue is paused for more than 30 seconds its status will change to stopped
CAUTION
Adding thousands of tracks to the queue may cause MA to become unresponsive depending on the resources of the host hardware. It is recommended to keep the queue to one thousand tracks or less.
Endless Mix
Section titled “Endless Mix”Endless Mix keeps the music playing by adding tracks similar to what you started from, using the similar tracks features of your streaming sources (Apple Music, Deezer, Spotify, Subsonic, Tidal, or YouTube Music). When this is selected Autoplay is enabled and can’t be disabled, and shuffle is disabled and can’t be enabled.
How Endless Mix picks tracks
Starting from a Track or Album: Endless Mix retrieves similar tracks using the track’s provider mappings (shown in the Provider Details section in the UI). When you start Endless Mix from a track in the library, Music Assistant checks each of the track’s provider mappings in order and uses the first source that supports the similar tracks feature. For example, if a track exists on both Spotify and Tidal, and Spotify is listed first in the provider mappings, Spotify’s similar tracks algorithm will be used exclusively. When starting from an album, Music Assistant first selects base tracks from that album, then applies the same provider selection logic for each track. If you start Endless Mix with a track or album that is not in the library (i.e., directly from a music source), that source’s similar tracks implementation is used.
Starting from an Artist: Endless Mix works differently when starting from an artist. For an artist in the library with multiple provider mappings, Music Assistant fetches the top tracks from all sources where that artist exists, combines them into a single pool, then randomly samples five tracks as the base. Each sampled track then queries its own source for similar tracks. This means Endless Mix started from an artist typically produces a diverse mix of results from multiple sources, as each base track contributes similar tracks from its respective source (e.g., some from Spotify, some from Tidal, some from Apple Music). For artists not in the library, only that source’s top tracks are used as the base.
Playlists
Section titled “Playlists”Playlists must be stored on a source. A music source’s playlist can only contain tracks from that source. However, MA has a built-in provider with the ability to create playlists that have tracks from multiple music sources. In this case the playlist will be stored solely within the MA database. These options are automatically presented in the Add to Playlist dialog.
Playlists can be created or added to from various menus in the different views. They can also be created in the Playlist view by clicking on the icon in the top right.
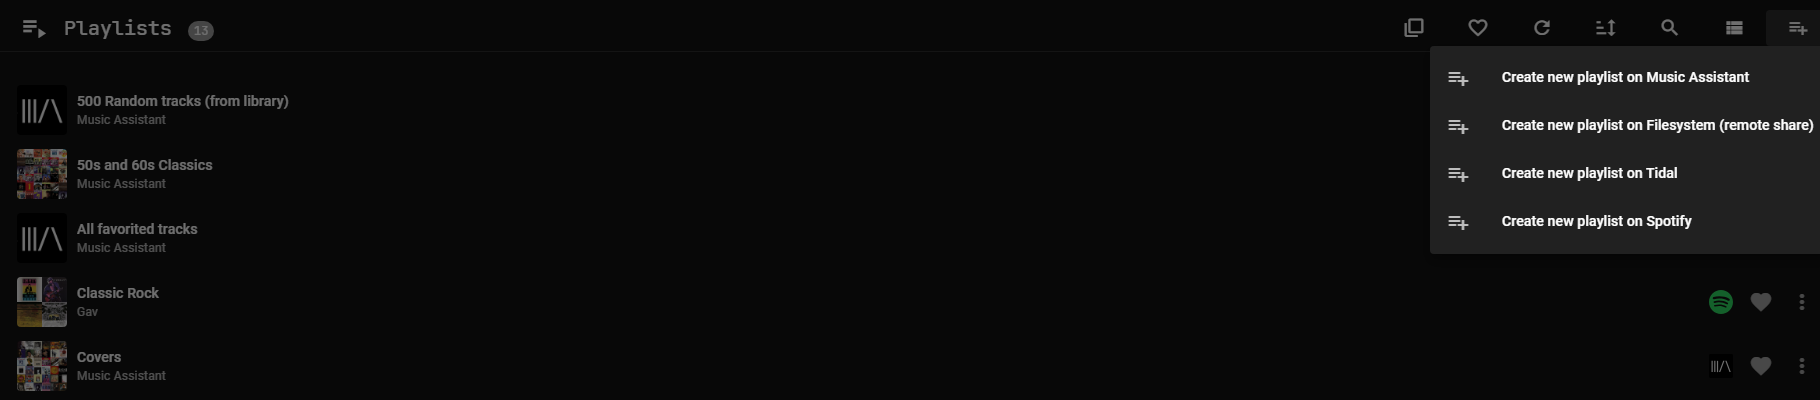
Playlists which consist solely of tracks from the filesystem source can be stored on the local filesystem if MA has write access. Music Assistant stores its own playlists inside its data storage; they are not written to your music folders.
User created playlists from streaming sources will be imported into the MA database and will remain synchronized regardless of whether changes are made from the MA UI or from the streaming source’s native application (assuming the streaming source has the functionality for two way sync). Refer to the individual Music Source pages for any limitations.
Playlists can be copied from one source to another by opening the original playlist and selecting all of the tracks and then in the ACTIONS menu select Add to Playlist and can also be imported and exported as described below.
Automatically generated playlists from streaming sources may be supported. See the specific source documentation for further information.
MA automatically generates some dynamic playlists. These playlists will be updated at the sync interval set for the Refresh playlist metadata task in Settings → System → Background tasks or they can be updated manually by navigating to the playlist and then pressing on the refresh icon  or by going to the ⋮ menu in the top right and selecting Refresh item.
There are also two pseudo-playlists, the Infinite Mixes (one based on the whole library and one on the favorites). Viewing these playlists shows no tracks; playing one results in an endless queue where 25 random tracks are added and refreshed as the queue comes to an end.
Playlist Artwork
Section titled “Playlist Artwork”MA will use the artwork supplied from the streaming providers. For local providers MA will create a collage based on the tracks in the playlist. Alternatively, for the local file system providers, an image which has the same prefix as the playlist will be used (eg. mix.m3u and mix.jpg)
Importing and Exporting
Section titled “Importing and Exporting”Music Assistant can export in-library playlists to M3U8 files and import them back, preserving far more detail than the standard M3U format allows. Use it to back up playlists, move them between MA instances, or migrate from one streaming provider to another.
Exports stay compatible with normal M3U players (VLC, Kodi, etc.), but MA adds extended tags that carry full metadata - ISRC (a unique ID that identifies a recording), MusicBrainz ID, artist/album info, provider mappings, and artwork. Other players ignore these; MA uses them to rebuild the playlist faithfully on import.
Exporting a playlist
Open the playlist to be exported, click the ⋮ menu in the header, and choose Export playlist. MA downloads a .m3u8 file named after the playlist.
Only playlists that live in the Music Assistant library can be exported; provider-owned playlists (e.g. ones that appear in Spotify or Tidal searches) do not show the option.
Importing a playlist
On the Playlists page, there is an option in the toolbar menu to Import playlist, select it and then pick a .m3u or .m3u8 file. MA creates a new library playlist from it.
In the import dialog, you will see a Search for tracks on list with a checkbox for each installed music provider. These are the providers MA will search when a track in the file can’t be played directly (for example, the file references a Spotify track but Spotify is no longer installed, or you are importing a M3U that someone else exported).
MA searches for the best available version on those providers, preferring exact matches on ISRC or MusicBrainz ID and falling back to title/artist/duration when those IDs aren’t present. You will see a “Playlist created” notification as soon as the import finishes, with an Open playlist shortcut. If MA can’t find a confident match for a track, the original reference is kept in the playlist so you can see what the original item was and fix it by hand.
Getting the best results
- Export from MA whenever possible. MA’s exports carry ISRC and MusicBrainz IDs, which produce near-perfect matches on import. Third-party M3U files only have title/artist/duration, so matching is fuzzier.
- Install the providers to be matched from before importing. MA only searches providers that are currently available. If migrating from Spotify to Tidal, install Tidal first.
- Use the provider checkboxes to scope matching. Leaving everything checked gives MA the widest net; narrow it if you want matches to come from one or two specific services.
Streaming Protocols
Section titled “Streaming Protocols”Music Assistant talks to your players using whichever streaming protocol suits them best; you do not normally need to think about this. Many devices support more than one protocol and Music Assistant combines all of the different protocols that it discovers into one player. Each player has a default protocol which is selectable in the settings that will always be used when playback is initiated to the individual player. When grouping players, Music Assistant will identify the most ideal protocol to use for grouping and playback, and will switch to that protocol without you needing to do anything. In some cases there might be an interruption to playback if the stream must be restarted.
Online Metadata Sources
Section titled “Online Metadata Sources”Music Assistant relies on metadata (artist details, artwork, lyrics) to look its best. It reads this from your locally tagged files and from free online sources. The free online resources limit how fast MA may query them, so:
- MA queries online resources very slowly in the background
- If your local files are badly tagged or have no images in the music folders, there will be a significant delay until artist thumbs appear
- If a track has no album artist tag, MA will not attempt to retrieve one from a metadata provider and will use Various Artists by default
Music Assistant never modifies the tags in your local files; online metadata retrieval only fills gaps in what your tags provide. See the Metadata section for the full detail of which online sources are used and when.
If you have local files with local artwork as well as streaming sources, preferably add the local source first and allow the sync to complete and all artwork to appear before adding the streaming sources. Not doing so can result in the streaming source artwork being preferred, although this can be fixed by using the images section in the artist view.
You can speed up the metadata retrieval for an individual item (including lyrics when a track is selected) by using the UPDATE METADATA option in the ⋮ menu in the top right corner of the individual artist, album, or track view.
This website uses privacy-first analytics to help us improve the site. You can view all data in our public dashboard.