

Individual Player Settings 
Section titled “Individual Player Settings ”Individual Player Settings are usually quite extensive. The typical headings of the various sections are shown in the following image and subsections below will expand on them. Some items are hidden unless the Show advanced settings toggle is on. Groups have the same sections but less settings available. Not all players have all the settings listed. Reference can be made to the Player Summary Table to identify some of the functionality that should be available for a given player type otherwise visit the settings page for the player.
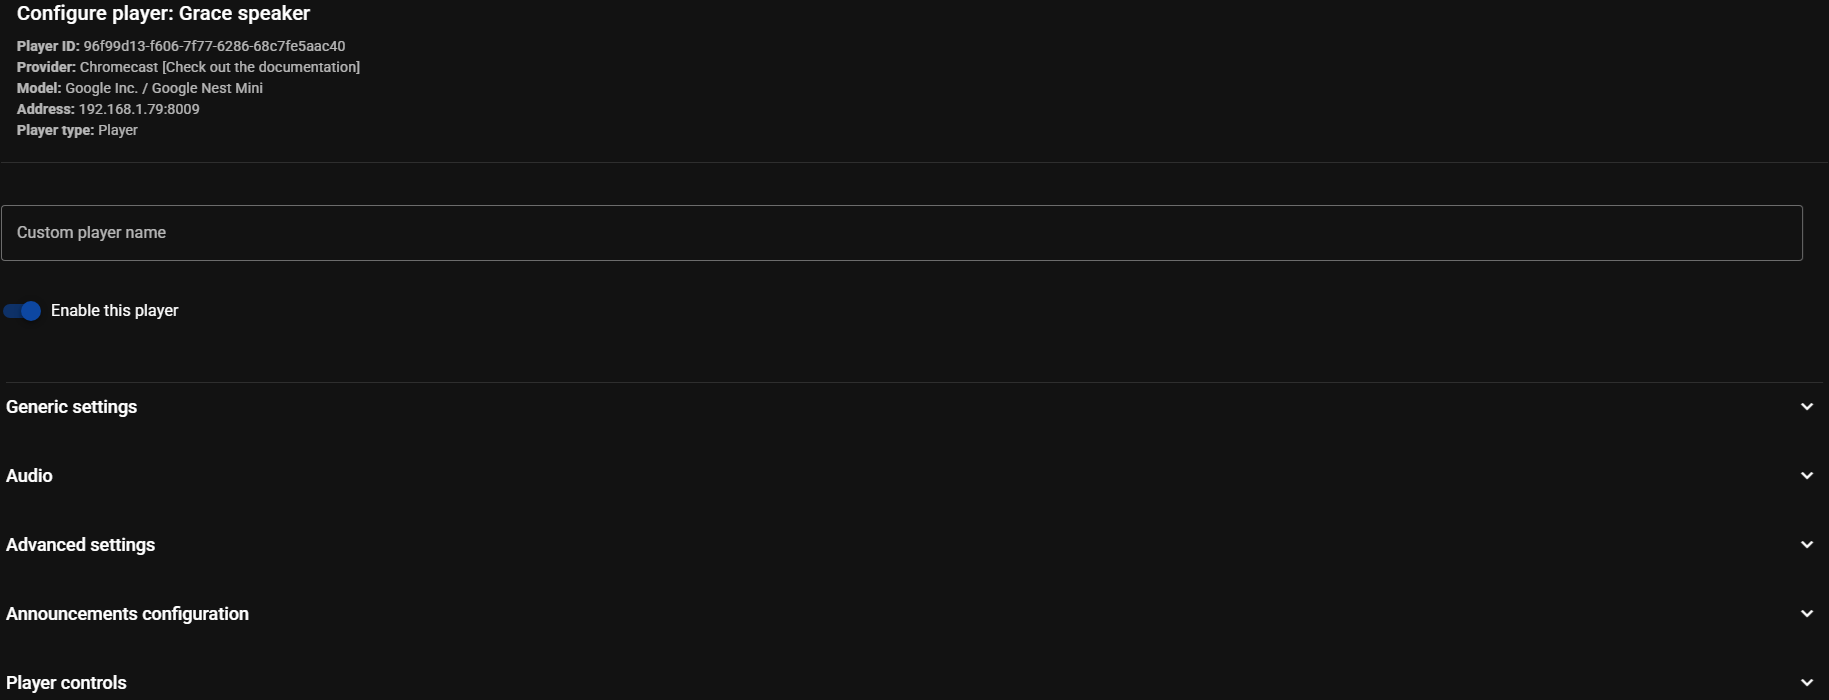
A powerful feature of Music Assistant is that it will combine all of the available protocols from a device into one player. The available protocols can be seen in the chips at the top of the page and in the Output Protocols section of the settings.
The Reconfigure button launches the configuration wizard for the player and for those with multiple protocols the one to be reconfigured will need to be selected from a drop down box.
Queue Settings
Section titled “Queue Settings”This is a link to the respective Queue Settings. It should be noted that these can be set globally in the Player Queues Settings
DSP Settings
Section titled “DSP Settings”All providers have the option to apply Digital Signal Processing (DSP) filters to the audio stream. This section is where the DSP is configured for each player, which means that each player has its own independently configurable DSP settings.
Full details of the DSP capabilities and the filters that are available can be found in the Digital Signal Processing section of the documentation.
Player Options
Section titled “Player Options”Some players (e.g. MusicCast have unique control features which are fully described in the documentation for the relevant player provider
Generic Settings
Section titled “Generic Settings”- Hide this player in the UI. This setting determines when the player will not be shown in the Player List and other areas of the UI
- Expose this player to Home Assistant. If disabled the player will not be imported into HA
- Icon. A material design icon is used in some parts of the UI and this can be configured on a per player basis
- Play Media overrides active group. When this player is currently captured by an active group or sync session, an explicit Play Media command (e.g. starting a new playlist or track from Home Assistant) will release this player from the group/sync and play the new media directly on this player. Disable this to keep the legacy behaviour where Play Media is redirected to the group leader. Other commands (next/prev/pause/resume) are always forwarded to the group leader as they act on the existing playback
Output Protocols
Section titled “Output Protocols”- Preferred Output Protocol. Choose from the list of available protocols
Each available protocol then has its own configuration section. Protocols can be disabled except for the native protocol of the device. A protocol whose toggle says (experimental) is switched off until you turn it on yourself, with a warning above the toggle explaining what to expect. The Audio Pipeline view shows which protocol a player is actually using and what the audio quality is at each stage.
Settings shared by most protocols
Section titled “Settings shared by most protocols”The settings below appear under most protocols and mean the same thing wherever you see them. Most people never need to change any of them. The defaults are chosen to work on the widest range of hardware, and the usual reason to come here is that something is not playing properly.
Two things are true of all of them:
- They are only visible when the
Show advanced settingstoggle is on - Changing one reloads the player, so anything currently playing stops briefly
Not every player shows every setting, and that is normal. A provider can set its own default, or hide a setting where it does not apply. Some also depend on what the player can do, so a player that always streams the queue in one go has no flow mode setting, and a player that reports its own capabilities has no sample rate setting. Where a player differs from the defaults below, its own page says so.
AirPlay, Sendspin and Snapcast do not stream over HTTP, so those players show only Output Channel Mode from this list.
Enable queue flow mode
Section titled “Enable queue flow mode”Sends the whole queue to the player as one continuous stream, instead of one track at a time. Off by default on most players, though several providers turn it on because their devices work better that way; those pages say so.
Turn it on if the player leaves a gap between tracks, fails to transition to the next track, or cannot do gapless playback at all. Music Assistant also switches it on by itself when crossfade is in use and the player cannot do gapless playback on its own, since stitching those tracks together needs one continuous stream.
The trade-off is that most players stop showing track information on their own display, because they only ever receive one long “track”. The ICY setting below can put some of it back. Track Queueing explains how this differs from letting the player queue the next track itself.
Flow Mode sample rate
Section titled “Flow Mode sample rate”Only applies when flow mode is on. A flow stream uses a single sample rate from start to finish, and this decides which one. Smart is the default and the right choice for almost everyone.
What each option does
| Option | Behaviour |
|---|---|
| Smart (default) | Starts at the first track’s rate, upsamples lower-rate tracks to match, and restarts the stream only when a track has a higher rate. The best balance of quality and seamless playback |
| Bit-perfect | Never resamples. Playback restarts between tracks of differing sample rates, which disables gapless and crossfade across those transitions |
| 48 kHz | Resamples everything to a fixed 48 kHz, or the closest rate the player supports. A good compromise of quality and bandwidth |
| 96 kHz | Resamples everything to a fixed 96 kHz, or the closest rate the player supports |
| Highest supported by player | Resamples everything to the highest rate the player supports. Best quality, but can waste a lot of bandwidth |
Try to inject metadata into stream (ICY)
Section titled “Try to inject metadata into stream (ICY)”Only applies when flow mode is on. Puts the track title and artist into the audio stream itself so the player can display them, in the same way internet radio stations do. Disabled by default.
Turn it on if your player shows nothing useful while flow mode is running. Start with Profile 1, and move to Profile 2 if you want album art as well. Not every player handles it correctly, so if playback becomes unreliable, step back down or turn it off again.
What each option does
| Option | Behaviour |
|---|---|
| Disabled - do not send ICY metadata (default) | No metadata is injected; the player will not show track info during flow mode |
| Profile 1 - basic info | Title and artist only. Lightweight and widely compatible |
| Profile 2 - full info (including image) | Also sends the album name and cover art. Richer, but some players mishandle it, so use Profile 1 if you see playback issues |
Output codec to use for streaming audio to the player
Section titled “Output codec to use for streaming audio to the player”The format Music Assistant encodes the audio into before sending it. FLAC by default, which is lossless.
Change it if the player cannot play FLAC, or to cut down network traffic on a weak Wi-Fi link. A lossy codec is a good first thing to try when playback stutters on wireless players.
What each option does
| Option | Behaviour |
|---|---|
| FLAC (lossless, compressed) (default) | Full quality at a moderate bitrate. The best choice for most players |
| MP3 (lossy) | Smaller bitrate at some quality cost. Use for players that cannot play FLAC, or to save bandwidth |
| AAC (lossy) | Comparable to MP3; pick it for players that prefer AAC |
| WAV (uncompressed PCM) | Highest bandwidth of the four. Only needed for players that cannot handle FLAC |
Sample rates supported by this player
Section titled “Sample rates supported by this player”The sample rates and bit depths this player can be sent without resampling. Anything higher is resampled down to fit. 44.1 kHz / 16 bit and 48 kHz / 16 bit are selected by default.
You choose the rates from a drop down list of checkboxes, and the ones you pick are then shown as chips in the field, so you can see the whole selection at a glance.
Rates go up to 384 kHz / 24 bit, though most providers narrow that list to what the device plausibly handles. On most players the selection is a safe starting point rather than something detected from the device, and the higher rates are there for you to try. If your player genuinely supports them, add them and you will get better quality. If playback breaks or the player falls silent, remove them again. Manufacturers vary, so test rather than assume. Some providers do detect the device’s capabilities and set this for you, and those pages say so.
Output Channel Mode
Section titled “Output Channel Mode”Whether the player receives both channels, one channel, or a mono mix of the two. Stereo by default.
The usual reason to change it is building a stereo pair from two players. Set one to Left channel only and the other to Right channel only, then group them.
Prefer low-latency WAV for live sources
Section titled “Prefer low-latency WAV for live sources”Sends live sources such as Spotify Connect and the AirPlay Receiver as uncompressed audio, so there is less delay before you hear them. Off by default on most players; providers that turn it on say so on their own page.
Turn it off if those sources are unreliable on your player; Music Assistant will fall back to the output codec set above.
HTTP Profile used for sending audio
Section titled “HTTP Profile used for sending audio”A low-level detail of how the audio is handed to the player. Profile 2 by default, and correct for most players.
The three differ in whether Music Assistant tells the player how much audio is coming before it starts sending any. Most players do not mind either way, but a few will not start, stop part way through, or refuse to skip within a track unless they are told in advance.
Change it only to fix a problem. If the player behaves in any of those ways, work through the other profiles.
What each option does
| Option | Behaviour |
|---|---|
| Profile 1 - chunked | Sends the audio in pieces as it is produced, without saying how much is coming |
| Profile 2 - no content length (default) | Sends the audio as one continuous stream, without saying how much is coming. Right for most players |
| Profile 3 - forced content length | Tells the player up front roughly how much audio to expect, worked out from the length of the track. Try this one first if the player will not start, cuts off early, or will not let you skip within a track |
Group Player Settings
Section titled “Group Player Settings”For group players the following settings will be seen. Group members and Allowed members are both chosen from a drop down list of checkboxes, with the players you pick then shown as chips in the field.
- Group members. The players that belong to this group
- Enable dynamic members toggle. This setting is available for Sync and Universal Groups. When enabled, it is then possible to add and remove members from these group types
- Allowed members. Limit which players can join this group. Leave empty to allow any sync-compatible player. This can be used to reduce the list of players that show up for joining in case you have a lot of players. Only shown when the advanced toggle is on
- Allow crossfades between tracks of different sample rates. Enable this option to allow crossfades between tracks that have different sample rates (e.g. 44.1kHz to 48kHz). Disable this option if you experience audio glitches during transitions between tracks. Only shown when the advanced toggle is on
Universal Groups default to Profile 1 - chunked for the HTTP Profile, rather than Profile 2 as elsewhere.
Announcements Configuration
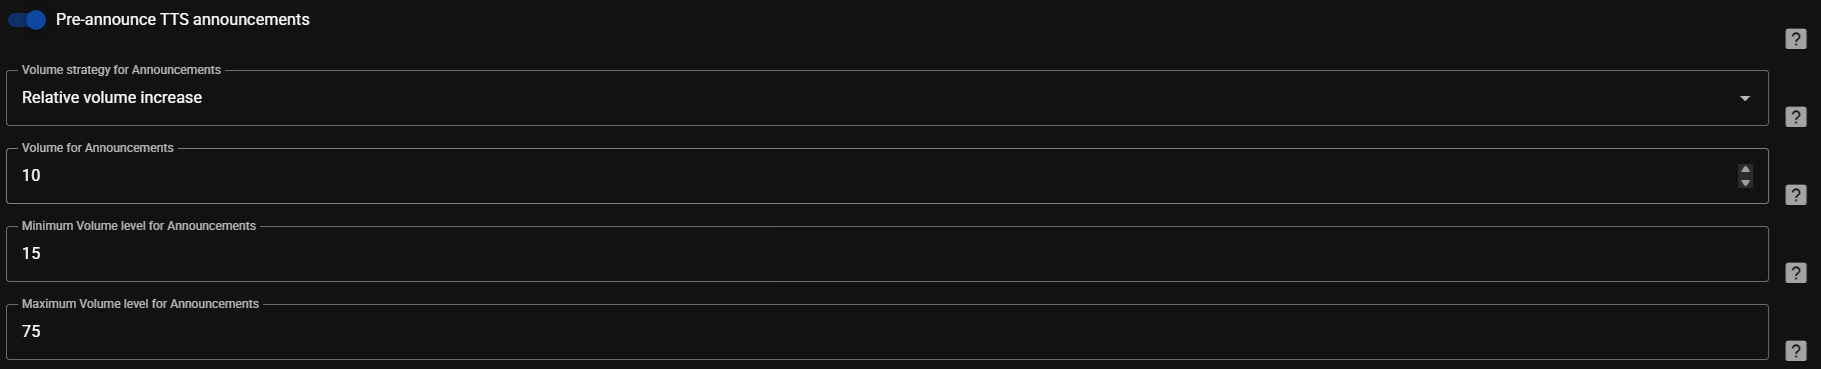
Section titled “Announcements Configuration”There are a number of configurable options for controlling the volume of announcements sent to the MA players. These are well described by the help available by selecting this icon  beside each field. The
 Maximum and Minimum Volume level boxes do not apply when the Absolute volume option is selected.
Player Controls
Section titled “Player Controls”Each player has a number of options available to control the behaviour of the power, volume and mute controls in the MA UI. By default, if a device supports these controls then that native behaviour will be used or if the control is not supported then it will be disabled in the UI (the setting will indicate NONE). It is also possible to manually disable the controls by changing the setting to NONE. Some of the options require the advanced toggle to be enabled before they can be seen.
It is possible to map other HA entities to the MA player controls. in order for this to be an option the HA entities need to be first exposed to MA via the settings in the HA Plugin.
Power If a player does not support power but it is desired that the player has an on and off state then a FAKE option is available which will simulate the on/off functionality. Power controls assume the underlying device is in a standby mode and not physically powered off.
Volume This allows the volume control to be defined or disabled.
Mute There is a FAKE option that will set the volume to zero and restore it when mute and unmute is commanded.
Minimum and Maximum Volume Two sliders allow the application of limits to the maximum and minimum values that are sent to the player. The volume sliders in the UI are rescaled so the full 0-100 range will still be seen. (Only shown when the advanced toggle is on)
Automatically play/resume on power on If the player supports power control then this option will cause the player to immediately start playing any items in the queue on power on.
This website uses privacy-first analytics to help us improve the site. You can view all data in our public dashboard.