

User Interface
Section titled “User Interface”Main Menu
Section titled “Main Menu”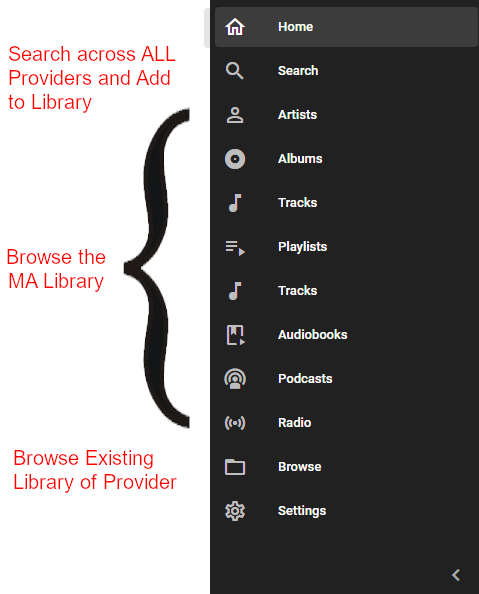
This menu’s appearance can be configured by clicking on the ⋮ in the bottom right and selecting Edit menu. Items can then be re-ordered, shown or hidden and section titles renamed.
In Settings → User Interface there are Display options which affect the UI. On a desktop, the menu can be placed vertically on the left or right or horizontally at the bottom (by selecting “Force mobile layout”). In the mobile layout, Menu, Discover, Search, and Players will be seen.
Sidebar Shortcuts
Section titled “Sidebar Shortcuts”Use shortcuts to pin frequently used library items to the main menu for quick access.
- Add a shortcut from an item’s context menu (⋮ menu, right click, or long press) by selecting Add to shortcuts.
- Remove it from the same menu with Remove from shortcuts.
- Shortcuts are stored per user account.
- If a pinned item is updated (for example renamed), the shortcut is updated automatically.
- If a pinned item is deleted, it is removed from shortcuts automatically.
Global Search
Section titled “Global Search”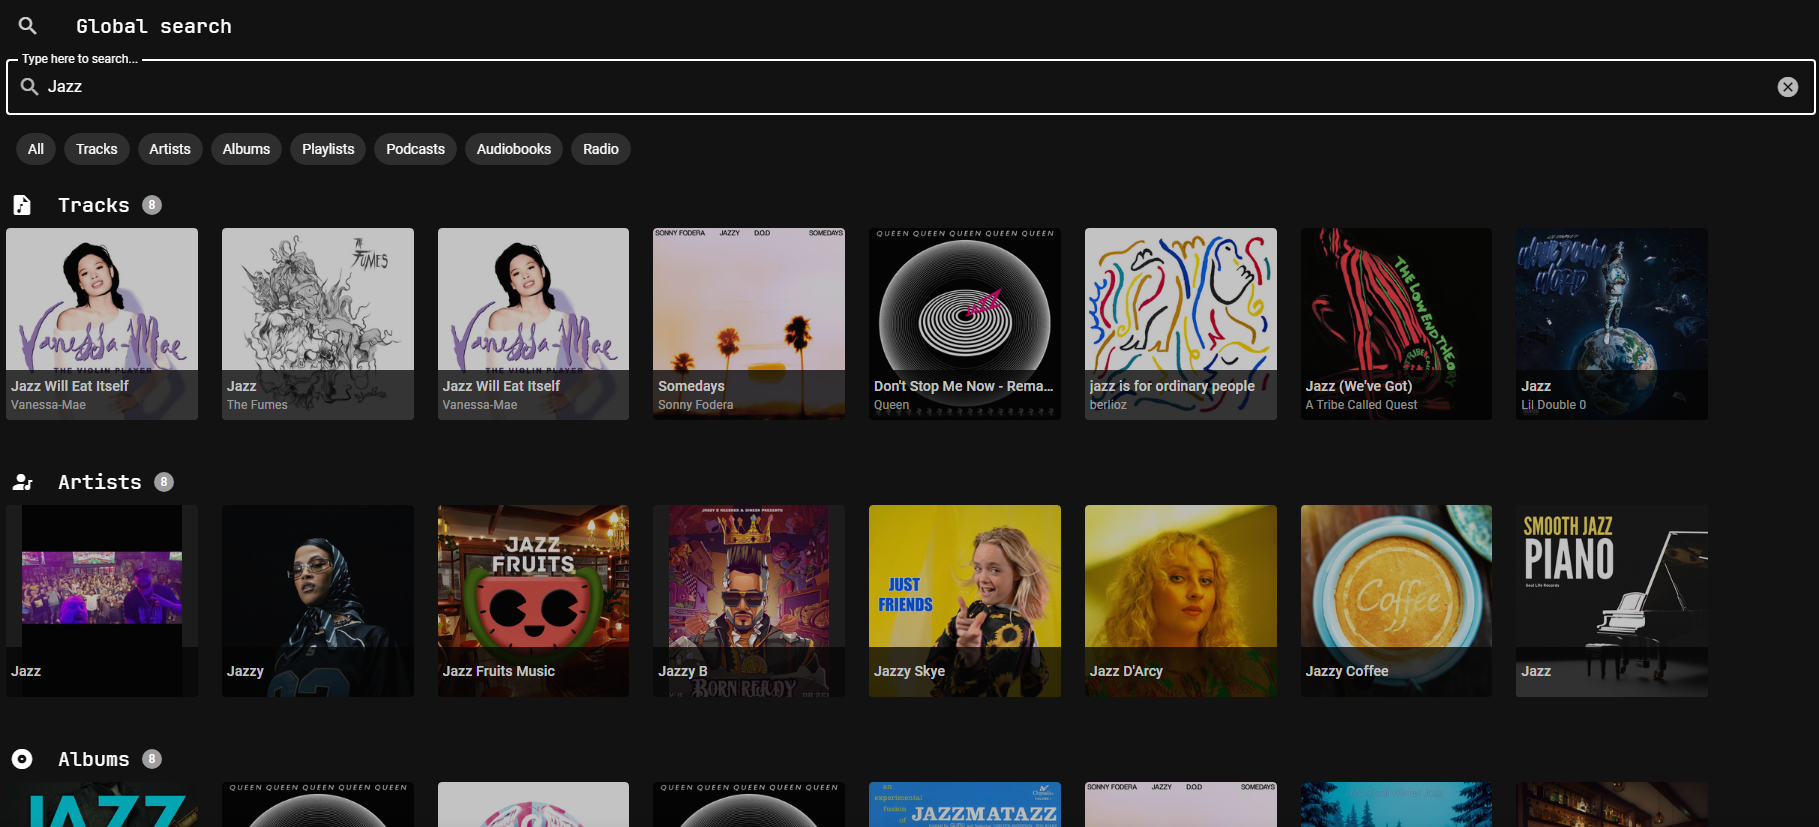
Searches can be done via any combination of words or partial words and also via a URL to a source such as https://open.spotify.com/album/0BwWUstDMUbgq2NYONRqlu
Initially, the view defaults to ALL which is limited to a maximum of 8 items in the eight categories of Tracks, Artists, Albums, Playlists, Podcasts, Audiobooks, Radio, and Genres. Which media types are shown can be selected with the filter. Similarly, the providers used for the search can also be filtered.
Selecting an individual media type will then show a maximum of 50 items per provider. Context sensitive menus are available for each. If the item desired is not found then narrow the search term.
Player Bar
Section titled “Player Bar”
The Audio Pipeline selectable label shows, via a colored icon and two letters, the sound quality of the audio output: LQ (Low Quality), SQ (Standard Quality), HQ (High Quality) or HR (Hi-Res). Select the label to see the full path the audio takes; what each quality level means is explained on the Audio Pipeline page. For groups, where the quality varies between players, the highest quality available will be indicated.
The overflow menu holds a number of useful options. Of note, for podcasts and audiobooks, there is a Change playback speed option which when selected will open a dialog with five preset speeds and a slider. The slider ranges from 0.5x to 2.0x and a preset is available for a boosted speed of 3.0x.
Now Playing View
Section titled “Now Playing View”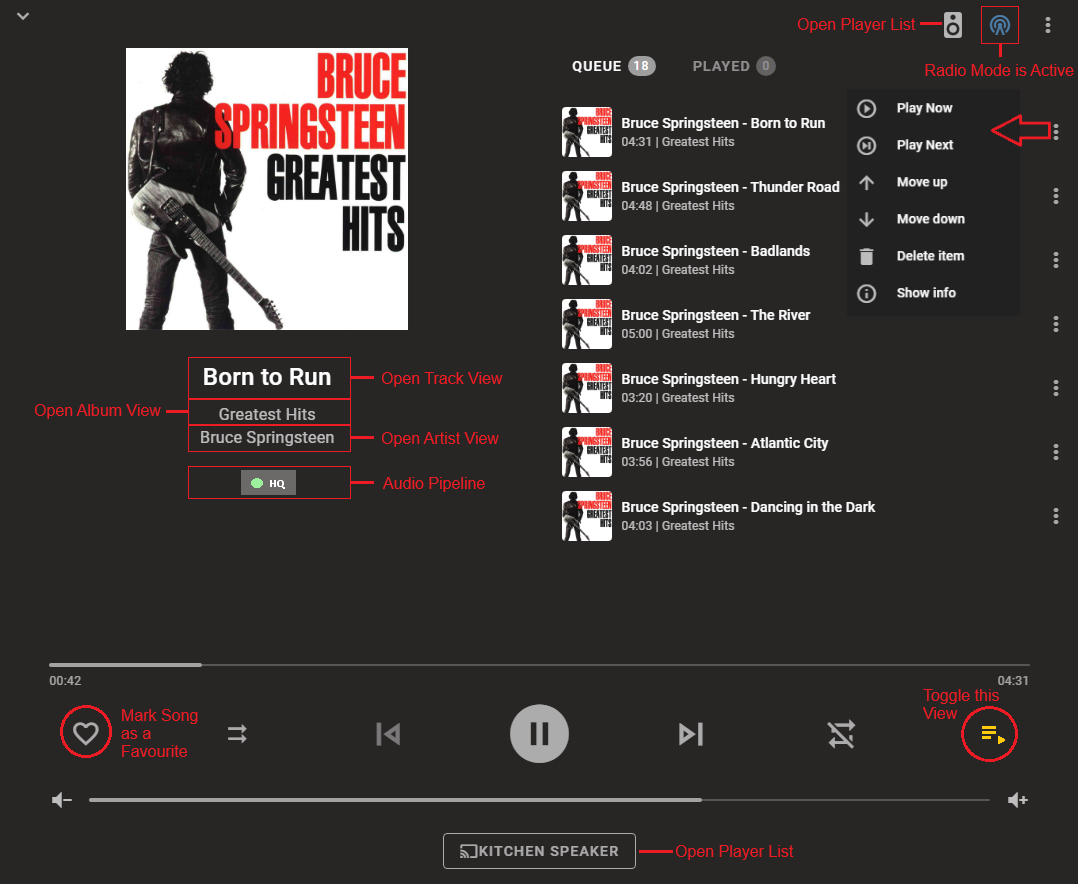
This view will change depending on screen width. With wider displays you will be able to see the track that is playing (and associated information) as well as the queue. With narrow displays you need to use the toggle in the bottom right to switch between the currently playing information and the queue. Adjustments to the queue can be done with the ⋮ menu on the right. This view can be cast to compatible devices using the cast icon in the top right.
The Audio Pipeline selectable label is described above in the Player Bar section.
You can also access the Now Playing view directly via URL
When the favorite icon is solid then selecting that will bring up two options - Remove from Favorites and Add to Playlist. It is possible that if the favorite status is changed from a different view after playback has commenced then the favorite status may not indicate correctly until playback of the track is restarted.
When lyrics are available for the track being played then the LYRICS selectable label will be shown in white. Upon selection, the queue will be replaced by the lyrics which will be in sync with the music when timing information is available. Accurate lyric selection is contingent upon the metadata providers and may not be accurate for alternate versions of a song. Adjustment to the lyric timing is available in the ⋮ menu.
The Autoplay and Crossfade toggleable buttons allow quick access to the behaviour configured at the global level or for the particular queue. Individual queue settings are available in the ⋮ menu.
A sleep timer is also available in the ⋮ menu, which will stop playback after the selected period.
The contents of the ⋮ menu vary depending upon player and queue state. When a track is playing the full set of options are available and will look like:

Player List
Section titled “Player List”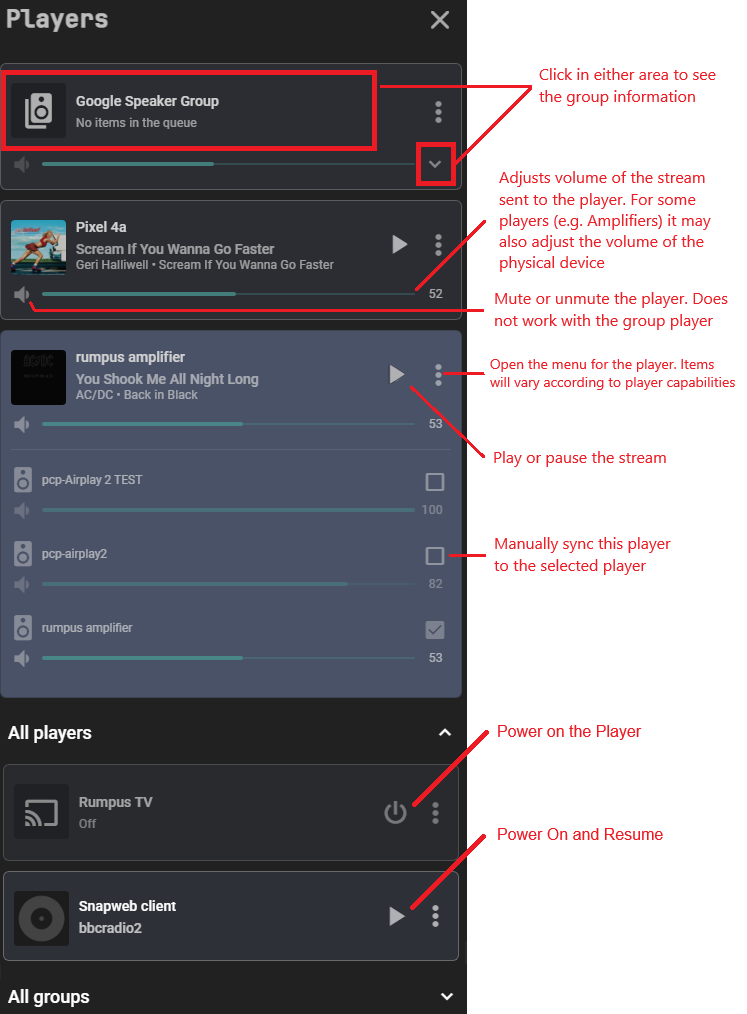
NOTE
The volume shown against a player group is the MAXIMUM of the volumes of the child players. When the group volume is changed then each player is changed by a proportionate amount such that all speakers reach 0 when the group slider hits 0 and 100 when it hits 100. The relative balance between speakers is preserved such that returning the group slider to the original value will revert each child player to their original volumes
When a player group is powered on the members of that group will disappear from the player list and individual playback to those players will not be possible. In order to playback to an individual player, then either power off the group or remove the player from the group.
NOTE
The icon shown against each player (a Material Design Icon) can be changed in the player settings.
Grouping Players
Section titled “Grouping Players”There are four ways to group players
- TEMPORARY SYNC GROUP. As shown in the Player List section players can be linked via the checkbox in the player list. Only like player types that support synced playback are allowed to be joined. These players will then play in sync. It should be noted that when players are grouped in this way only the main player holds the queue.
- SYNC GROUP. Create a (permanent) group player from the players list in the settings; its members are then set on the player’s own settings page. In addition to playing in sync the group will also keep the queue on the group player instead of one of its child players.
- UNIVERSAL GROUP. This allows grouping of dissimilar player provider types but carefully note the potential limitations on the linked page.
- NATIVE GROUP. Use the native functionality to group players offered by some player provider types (e.g. Google Cast)
NOTE
If an attempt is made to power on a group and a member of that group is already a member of another powered on group then an error will be shown.
NOTE
If a player is taken over by another app, MA will not have knowledge of that, and the group may no longer function correctly. Additionally, if a player of a sync group tries to join late (e.g. it was unpowered) it will not be synced to the group.
Play Button 
Section titled “Play Button ”The play button is used as a shortcut to play the various items in the UI. It is shown on hover for non-mobile devices or is always in view for mobile devices.
Clicking/touching the Play Button will either execute the default play action for the item or show the play menu. To ensure the user doesn’t accidentally play on the wrong player, the play menu will show:
- the first time the MA view is entered; or
- if the player is not playing (or paused)
NOTE
If there is ever uncertainty as to whether the item will immediately start playing use a right click or long press to bring up the menu.
Multi Select 
Section titled “Multi Select ”When the Multi Select icon is selected the Select All icon will appear.
Clicking/touching the Select All icon will select all of the items in the view (or section of the view as appropriate). For large lists a confirmation dialog will appear, as selecting thousands of items can cause unresponsiveness depending on the resources of the host.
CTRL-A will also select all items unless the search box is in view in which case it will select all text in that box. Also CTRL-A won’t work on views that have multiple sections (e.g. the artist view has albums and tracks) so the Multi Select icon must be used in that case.
Track Menu
Section titled “Track Menu”In any of the following views, Right click or long press on a track to get the following menus
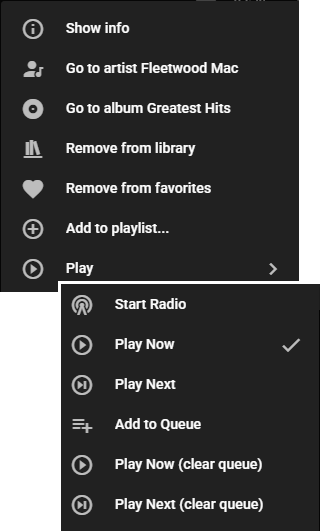
The View … endless mix option will only be seen if there is a provider that supports it. The wording follows what you selected, so it reads track, album or artist. It populates the queue with tracks based on that selection. The tracks are selected by the provider not MA.
View - Discover
Section titled “View - Discover”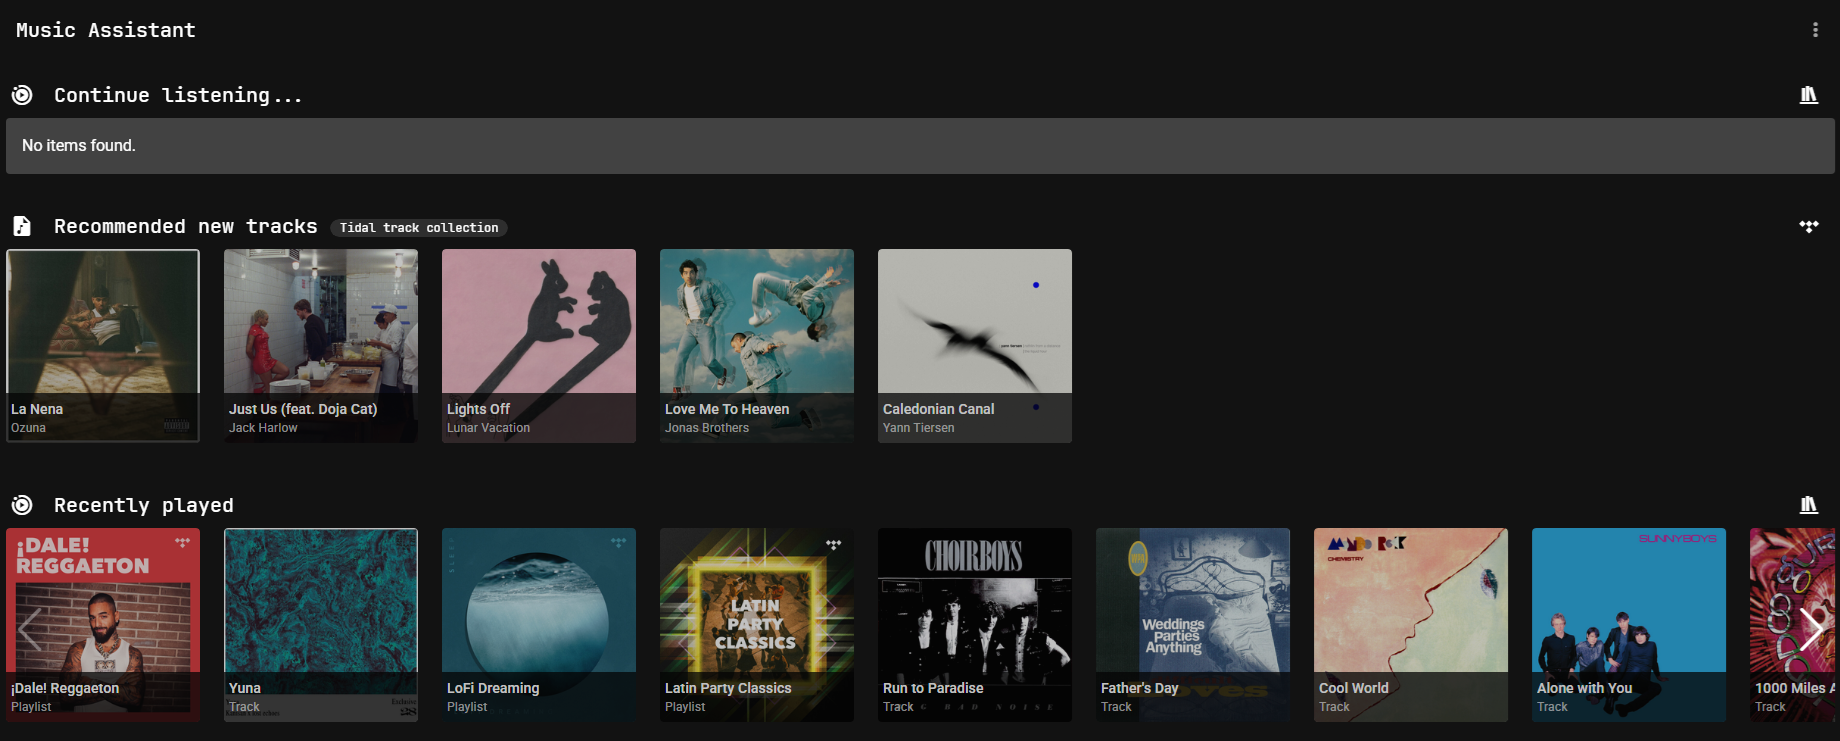
The Discover view provides quick access to different media types and recommendations. Recommendation rows load independently, so content appears one row at a time as it becomes available. Each enabled music provider can supply its own rows.
Select the pencil icon in the top right to enter edit mode. From there, show or hide rows and drag them into your preferred order. Some specialized or slower-loading rows are hidden by default to keep Discover fast; enable them in edit mode if you want to use them. Select Leave edit mode to return to the normal view.
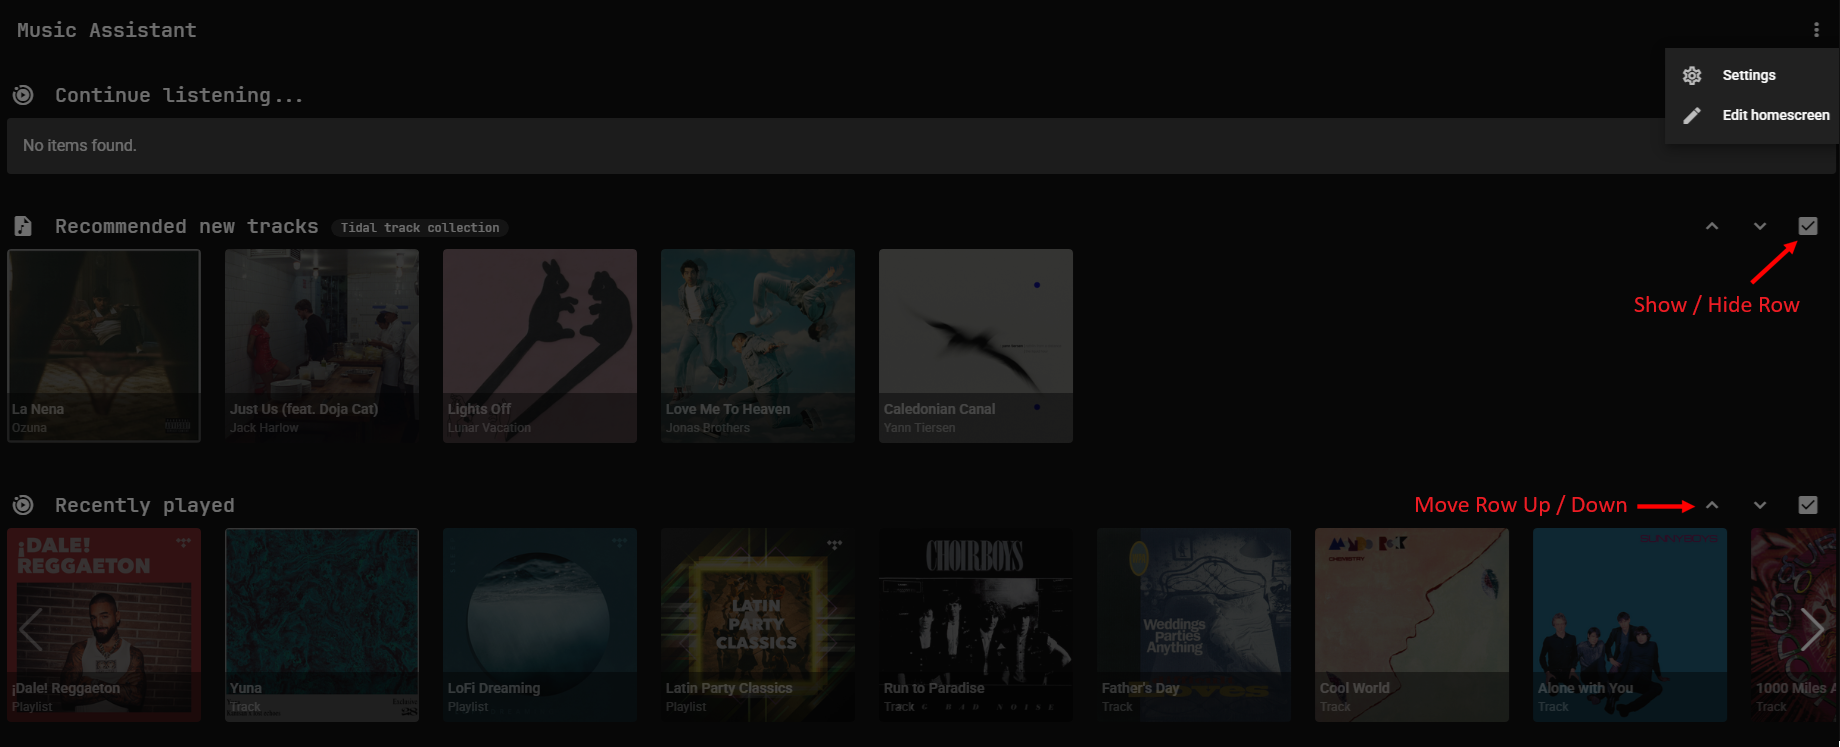
Refer to the Library Recommendations Plugin for information about the available recommendations rows that are built into Music Assistant.
View - Artist / Album / Track
Section titled “View - Artist / Album / Track”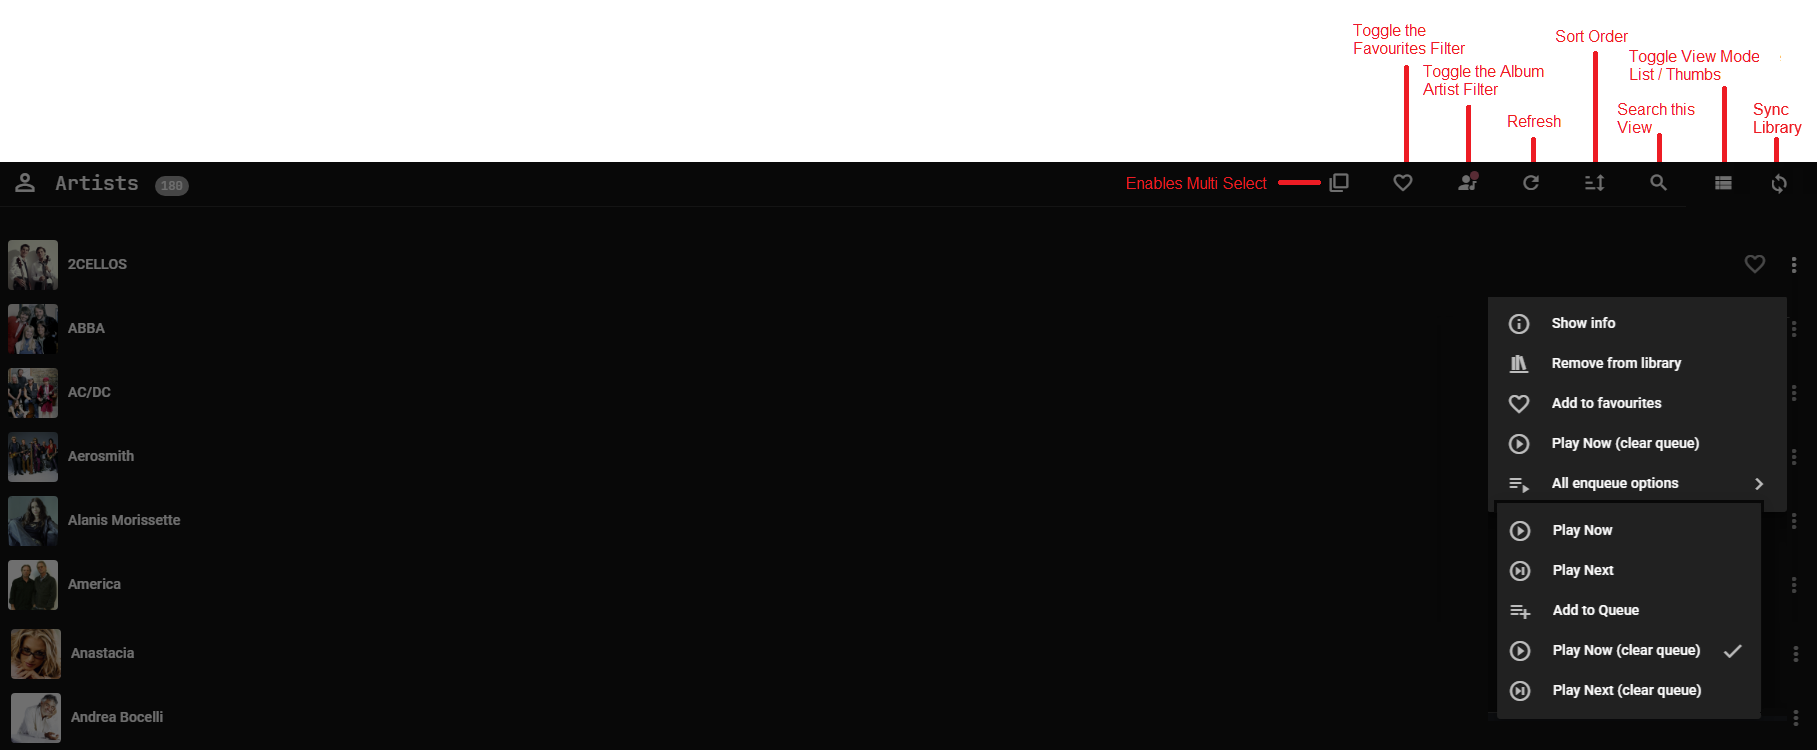
Album, Track and Playlist Views look similar to the above except there is no album artist filter option and the track view has an ADD VIA URL option. Playlists have a Create new playlist on option as well as a Import playlist option which allows the manual importation of plain text M3U and M3U8 playlist files.
A blue dot on any icon (e.g. search icon  ) indicates that the viewed results are subject to filtering.
The provider filter option will only show when there are two or more music sources installed that support the media type being viewed. Multiple providers can be selected as part of the filter.
Items in all views can be “right-clicked” or “long-pressed” to bring up an extensive menu of options which is the same as that accessed by the ⋮ menu on the right. In the image above the complete list of possibilities is shown and this will vary slightly depending on the current view.
Multiple selections of albums / artists / tracks is possible by clicking the multi-select icon. Once one or more items are selected then clicking on the “ACTIONS” at the bottom

will bring up this menu
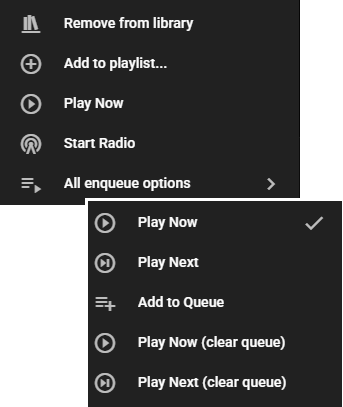
The behavior described above will work on any view where you see the “x item(s) selected” text.
View - Individual Artist
Section titled “View - Individual Artist”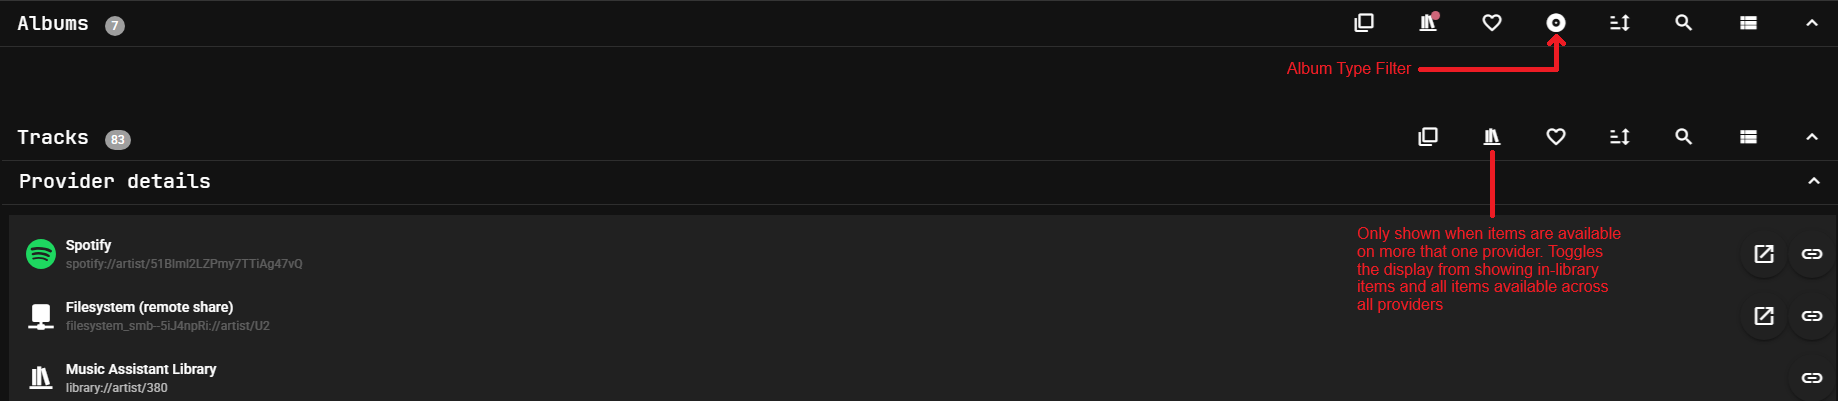
Each section is collapsible. The tracks section shows all tracks that are in the library. The Top tracks section can be filtered by provider when there is more that one available to provide that data.
The album section has an additional filter option. You can choose to filter by or in any combination of ALBUM, SINGLE, COMPILATION, EP, LIVE, SOUNDTRACK or UNKNOWN album types.
Expanding the IMAGES section (only visible to users with the Administrators role) allows for the selection of Thumb, Fanart or Logo. The other types shown are not used in the UI at this time. If there are no or limited images shown or the Images section is missing then go to the ⋮ menu in the top right of the view and select UPDATE METADATA. Right click on an image to make it the primary to be used. (Similar functionality is also available in the album view for Thumb)
Provider Details
Section titled “Provider Details”The PROVIDER DETAILS section (read only for other than users with the Administrator role) shows what providers are linked to the artist (albums and tracks have a similar section) across the available providers. It is normal to have multiple entries here if an artist has aliases or there are variant spellings, use of punctuation, etc. Thus there may be many entries showing matching links within a provider and across providers. Cross linking across and within providers occurs when the item is added to the MA library and can be triggered by using the  icon. Adding a new provider does not trigger linking across existing library items.
When an item is available from several providers, Music Assistant picks the highest quality one at playback time. See Stream Selection for how that choice is made.
The creation of links within the MA library to other identical items in the MA library (within or across providers) can occur when an item is added to the MA library. Links will be made automatically if internal matching logic is satisfied.
Incorrect mappings can be removed via the delete option in the ⋮ menu. For local files incorrect links may occur if the source file isn’t comprehensively tagged.
The ID shown against the streaming provider may be used in automations and scripts and is obtainable by pressing the ⋮ icon on the right. Also in this menu, for streaming providers, is an external link which opens the page for the item on the source provider.
View - Individual Track
Section titled “View - Individual Track”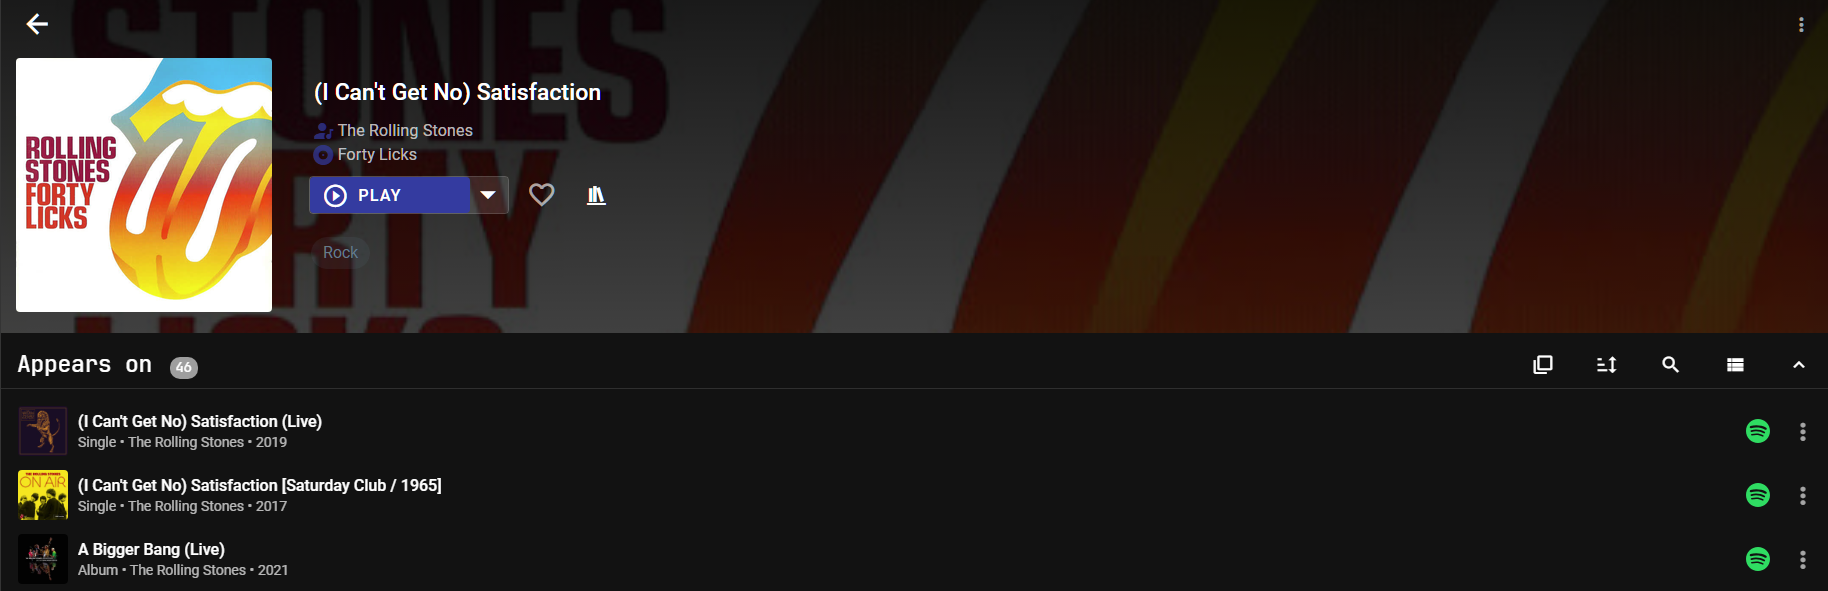
NOTE
The PROVIDER DETAILS section in this view also has the functionality to play a short sample of the track on the local device. Any indicated sample rate and bit depth are as reported by the provider and may differ during playback if transcoding is done before the audio data reaches MA.
View - Audiobooks
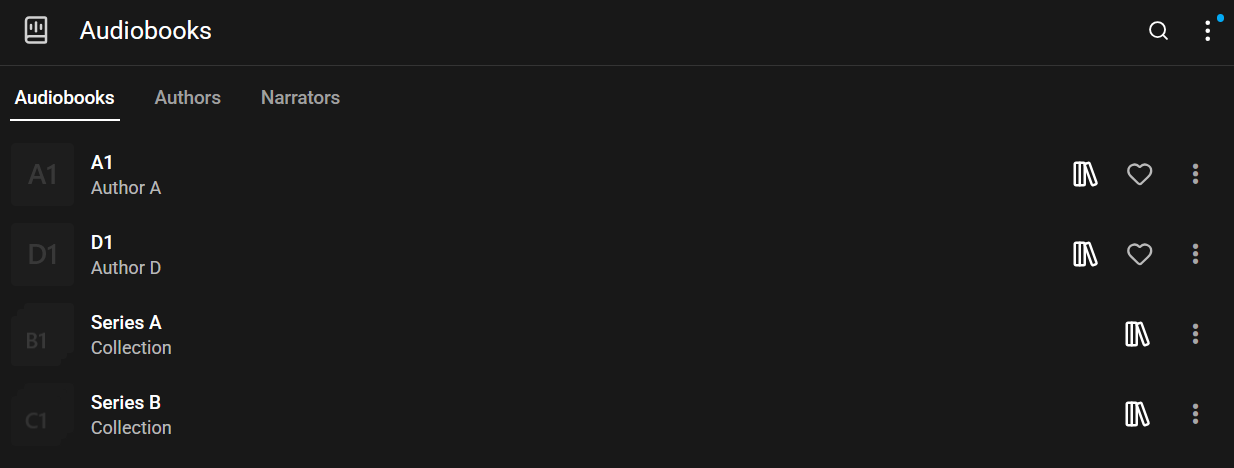
Section titled “View - Audiobooks”The audiobooks view shows available audiobooks in your library.
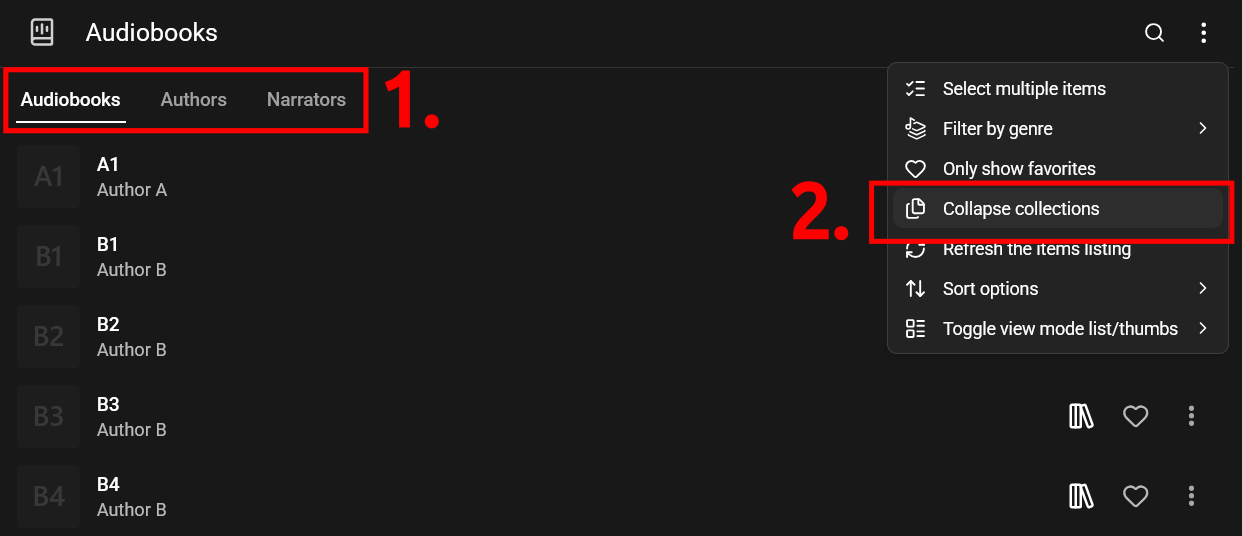
- Tabs for audiobooks, authors and narrators. These tabs are only shown if at least one of your configured music sources supports syncing of authors and/ or narrators to the Music Assistant library. Otherwise there is only the plain audiobooks view without tabs.
- Collapse collections: If the music source supports syncing collections (e.g. audiobook series) to Music Assistant, using “Collapse collections” minimizes these collections to single items.
View - Audiobooks Collection & Author/ Narrator details
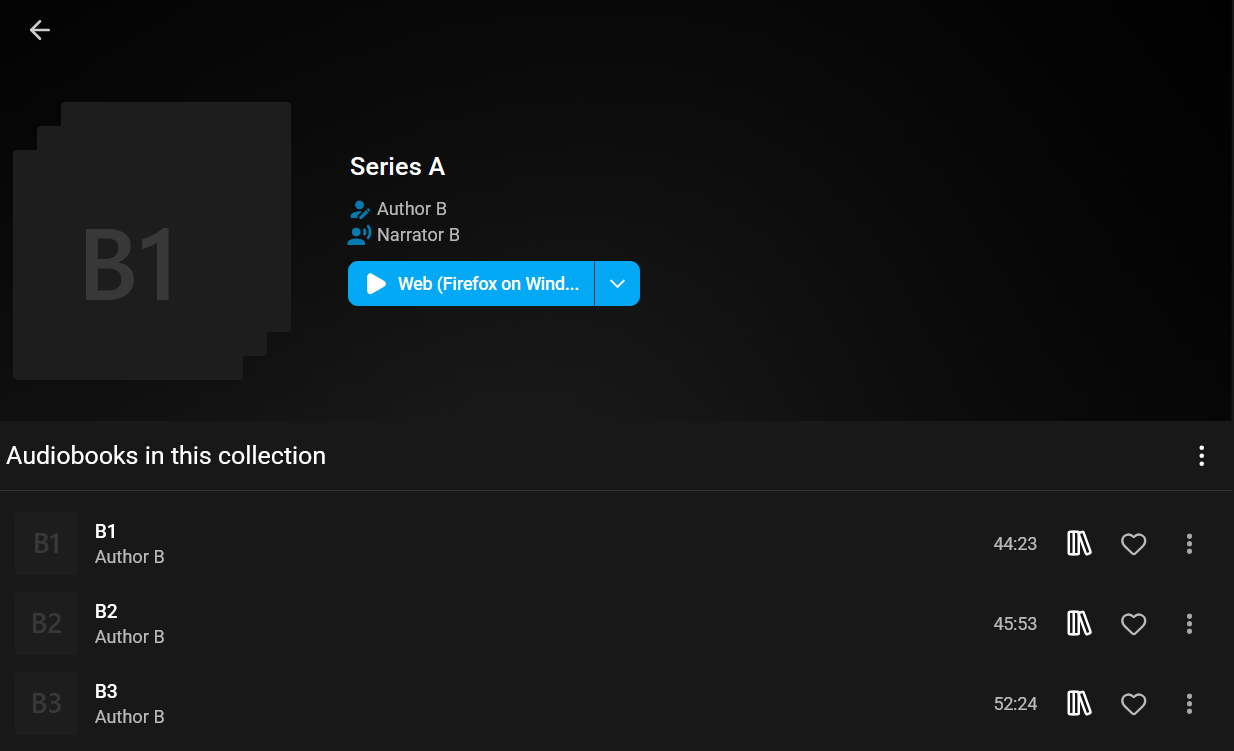
Section titled “View - Audiobooks Collection & Author/ Narrator details”The collection subview shows audiobooks in a collection. The items are sorted in the order given by the music source. When you play a collection, it will always enqueue the first not fully played item.
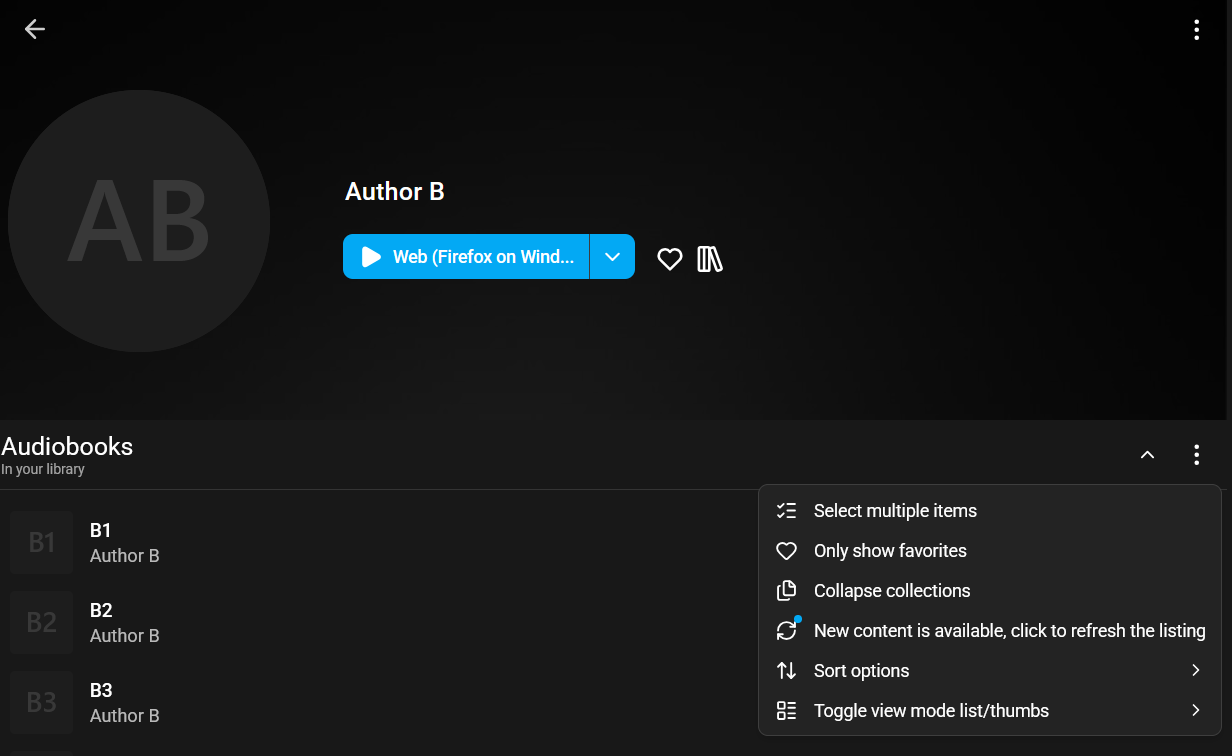
The author & narrator subview shows audiobooks belonging to the given artist. For library items it is possible to collapse collections.
View - Radio
Section titled “View - Radio”The Radio view shows streaming radio stations that are available in the MA library. Stations can be added to the library in the following ways:
-
Add item from URL - A URL for a streaming radio station (e.g. self-hosted Icecast stations) can be added to the library by selecting
Add item from URLfrom the menu in the top right of the Radio view. When filtering by provider, they will be shown as provided by “Music Assistant”. -
Music providers that support Radio items will have those items shown here when they are added to the library
View - Browse
Section titled “View - Browse”Entering the Browse view will present a list of the installed Music Sources that have a browse capability. Selecting one of those will show a relevant list of the items from that source that can be browsed.
When viewing a source which has a native library then only what is in that library will be seen. For the local sources and other sources that do not have a native library, you will see all items available from the source. For local sources, if a folder is visited that is not already in the MA Library it will be automatically added even if it has been previously removed.
CAUTION
Be careful once browsing within the source as selecting PLAY on a folder will play everything in that folder and all subfolders. Attempting to play thousands of tracks may consume an excessive amount of system resources on the host and cause MA to crash or become unresponsive.
This website uses privacy-first analytics to help us improve the site. You can view all data in our public dashboard.